Thursday, March 29, 2012

ThePirateBay Stopped Serving Torrent Files – How to Use Magnets to Get Your Torrents


ThePirateBay had decided to stop serving .torrent files almost 2 years ago which couldn’t happen at that time due to various reasons. But a few days before, in an official announcement they told they had finally made switch to the tracker-less mode of torrents i.e To serve torrents via Magnet Links.
Every torrent file being shared by more than ten people have been replaced by the new magnet links. As a result, the torrent will be downloaded from those that have already downloaded the files, and not from ThePirateBay servers.
What Are Magnet Links?
Keeping it simple, A Magnet is a Link which helps the Torrent client retrieve a .torrent file from another user who is using the same. The main purpose of this is to give people an alternative way of downloading the torrent file incase the website hosting the torrents are unavailable.
Magnet Links are represented with this icon
Most of the newest updated Torrent Clients support magnet links hence you should not have any problem in using them to get your torrents.

How to Use Magnet Links.
Step 1. Incase you are using an older version of Torrent Client, Update the client so that it supports Magnet Links.
Step 2. Open your torrent client (Example shown here is uTorrent Client) > Go to Preferences > BitTorrent > Make sure the following are ticked in there:
1. Enable DHT Network
2. Enable DHT for new torrents
3. Enable Peer Exchange.


Step 3. Go to the torrent URL on ThePirateBay.Se which you want to download.
Step 4. Click on the Red Magnet Icon.


Step 5. You might get a popup asking you which application to associate the file with, Select your torrent client and Click OK.


Step 6.
 The normal torrent information popup will appear in your client along with the list of files and other details.
Note: It might take a few seconds to retrieve the Torrent Information in the client.

Advantages of Magnet Links.
  1. Reduces server load for torrent indexers like ThePirateBay as the .torrent files do not exist on the server.
  2. Reduces server space for torrent indexers.
  3. The end user does not have to rely on the Torrent Indexer’s Uptime in order to get the torrent file, They can be independent of the torrent server site and grab the .torrent file from other users.
Disadvantaged of Magnet Links.
  1. The magnet links take a little bit of time to show up the torrent information like files contained etc because the file is grabbed from other users.
  2. Older torrent clients might not support the magnet links.

Hope you liked the article.hit like and share it with your friends on facbook and twitter 


Angry Birds Space Available for Download on Your Device


Rovio has finally announced the launch of one of the most addictive games, Angry Birds. The newest version is titled as ‘Angry Birds Space’. This version is available for the following platforms and devices.
  1. Android
  2. iPad
  3. iPhone
  4. PC
  5. Mac
Here is the short description of Angry Birds Space.
After a giant claw kidnaps their eggs, the Angry Birds chase it into a wormhole and find themselves floating in a strange new galaxy – surrounded by space pigs! Luckily the Angry Birds have super powers of their own…
Angry Birds Space features 60 interstellar levels on planets and in zero gravity, resulting in spectacular gameplay ranging from slow-motion puzzles to lightspeed destruction. With regular free updates, brand new birds, brand new superpowers, and a whole galaxy to explore, the sky is no longer the limit!
The Game Features the following:
  • 60 interstellar levels!
  • Regular free updates!
  • Brand new birds!
  • Brand new superpowers!
  • Zero-gravity space adventures!
  • Trick shots using planets’ gravity!
  • Hidden bonus levels!
  • Beautifully detailed backgrounds!
Watch the Angry Birds Space Video.
Angry Birds Space Download Links.
Angry Birds Space on Android [Free : Ad Supported]


Angry Birds Space on iPad [Price : $2.99]
Angry Birds Space on iPhone [Price : $0.99]
Angry Birds Space on Mac [Price : $4.99]
It is to be noted that there might be several Rouge applications existing in the Android Market (Google Play) or other websites. Make sure you download Apps from Official Sites only.
Share this game with your friends on Facebook and Twitter

Monday, March 26, 2012

Instagram for Android Opens Registrations to Early Beta


Instagram for Android is no longer a rumor, Its for real and its coming very soon. This is confirmed since the company has opened up its Early Beta Invite registration forms to get early access to the beta app before it hits Google Play/Android Market.
Instagram as we all know is a huge success in the iOS market where in it had covered almost 27 Million users.
Instagram CEO Kevin Systrom revealed that the company has two people working on the Android version of the Instagram app which he says will see the company “address an entirely new market” and see its audience double. Of course that is for sure since Android users have been waiting ever since for the Instagram android app and when this opens up, The download numbers are going to be whooping.
A sneak peek of the Android version of Instagram is posted below, Though we cannot confirm if this is going to be the beta release UI. 
<Image Credits>


Signup and Get Early Access to Instagram for Android.


You can signup for the Beta Invite using the Registration Form here : [LINK]
Upon entering your E-Mail the form says “Thanks for signing up! We’ll be in touch soon! “. Lets hope the ‘soon’ comes soon ;)

Are you waiting to see Instagram for Android? Leave your replies!


Friday, March 23, 2012

How to protect yourself from undesirable photo tags on Facebook

Facebook has a photo tagging feature which help users to tag other people on photos. This is a nice feature to enjoy group photo with all friends in the photo. But Most of the users use this feature just to increase popularity of the photo by tagging all friends on the photo to get the attention. This is panic to be tagged into an inappropriate photos.
You can protect yourself from these photo tags by following some simple steps. First of all know how to remove these inappropriate photo tags to block notifications about that photo. Follow these steps to remove a photo tag.
  • Go to your photo and then find the photo from which you want to remove the tag.
  • Click on the photo and then find “On your timeline · Remove” Click on remove here.
 You can also do the same by scrolling down you timeline till you find the photo and then click on the pencil icon. After clicking on the pencil icon, find the option to remove tag. Select the proper reason to remove the tag and then click on continue.


Now you should change some privacy settings to protect your timeline from these unwanted photo tags. Follow these steps.
  • Click on the drop down icon on the navigation bas after the home and then click on Privacy Settings.

  • Here find the option “Timeline and Tagging”
  • Click on Edit setting just after it.

  • You need to turn on the setting “Review posts friend tag you in before they appear on your timeline”. To do this, click on off just before it and then enable it in the option given in the next window.
  • Now click on save and then click on done to save the new settings.
After this, each time a friend want to tag you in a photo, you will get a confirmation notification. Photo will appear only if you will approve the tag.


 done!!!!


Facebook Brings Full Screen Photos, 4X Higher Resolution

Facebook has been changing the Facebook photos for past few months. It rolled out new photo viewer and bigger photo. Now it brings 4 times better resolution to photos. Now, Facebook will display photos in high-resolution and allow full-screen viewing of images.

 Now Facebook photo viewer shows photos at the maximum resolution of the photo. Maximum upload size of the photo is 2048 x 2048 pixel. Facebook has also improved the sRGB color profile oh the photos so that colors of photos appear better and load faster.Standard photos can slow down the load time by 30%. To make the website load faster, image scientist Apostolos “Toli” Lerios found and removed the parts of the color profile that aren’t needed to display an image.
Only users with Google Chrome or other latest browsers can use the full screen mode feature. To see the photo in full screen, take the mouse to the top right corner of the photo. Here you will see the arrow with a tip saying “Full Screen Mode.” Click on this to switch to the full screen mode.


Fullscreen mode can also be reached by clicking “Display Fullscreen” in the Options menu beneath photos.
Try this new photo update and tell us your experience. Do you think it is better or loading slowly?

How to Get 23GB+ of Free Space on Your Dropbox Account If You Have an Android Phone.

Step 1. Download this APK file. [LINK]
Step 2. Uninstall your existing Dropbox App from your Android Phone, Go to Settings > Applications > Manage Applications > Dropbox > Uninstall.
Step 3. Install the Downloaded APK file which is a modified version of Dropbox app. (Modded by a beloved XDA Member : theos0o)
Step 4. Open the Application > Enter your Email and Password of your Dropbox account.
Step 5. Check your E-Mail associated with the Dropbox for an Email from Dropbox which reads the following:
Hi ****** (Your Username),
Congrats on becoming a Dropbox Guru! We’ve awarded you 23 GB of bonus space for the next 24 months! You now have 27.38 GB on Dropbox. To get even more space, check out our upgrade options.
Thanks again for supercharging your HTC device with Dropbox!
Enjoy,
- The Dropbox Team


If you have Dropbox PC Software installed, You can expect this popup:


You are probably overjoyed if you are a Cloud Storage freak (I am one).
Now what about those who don’t have an Android? No I won’t disappoint you by saying you need to have an android to avail this offer. Read on.
How to Get 23GB+ of Free Space on Your Dropbox Account If You DON’T Have an Android Phone.
This part is taken from this post [LINK]

Part 1 – Installing the Android Emulator.

Step 1. Download the required Android SDK from this [LINK] according to your platform.
Step 2. Install it on any of your drives.
Step 3. Launch the SDK Manager.exe from the Start Menu.
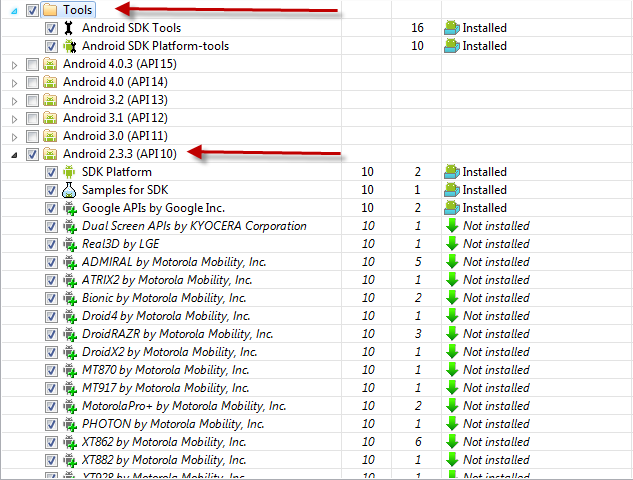
Step 4. It will show the Installed Packages and Options to install the uninstalled packages.
Step 5. Untick all the packages and Re-Tick only ‘Tools’ and ‘Android 2.3.3 (API 10)’, Click Install Packages > Accept. It might take some time depending on your Internet Connection.


Part 2 – Creating Android Virtual Device.

Step 1. Launch AVD Manager.exe from Start Menu.
Step 2. Click New > In the new window, Enter any Name, Choose Target as Android 2.3.3 – API Level 10, Size anything like 150MB,200MB etc.

Step 3. Click Create AVD, It might seem to be Not Responding but wait till the AVD is created (might take 1-2 Minutes)
Step 4. Choose the newly created AVD and click Start > Launch.


Part 3 – Upgrading the Dropbox to 23GB+.

Step 1. Initial Launch might take some time, After the Android Home Screen is loaded. Unlock the screen by Sliding the Lock Icon to the right.
Step 2. Click on the Web Icon.
Step 3. Paste the following URL in the Address Bar of Android Browser “http://db.tt/S7MnNnBh
Step 4. Your Application will be downloaded in your Downloads Folder in Menu.
Step 5. Install the application.
Step 6. Open the app, Enter your Dropbox Email and Password > Login.
Step 7. Check your Dropbox account and you will see that your account has been gifted with 23GB of free storage or Check your E-Mail ID for an E-Mail from the dropbox team.
[Credits : XDA]
Note : This storage is valid for 2 Years only.
Hope you enjoyed the article and successfully upgraded your Dropbox account.


Thursday, March 22, 2012

“Mass Hacking of Facebook Accounts May Have Started as Long as 48 Hours Ago..”


Many facebook users are reporting that they have been experiencing extreme spamming on their profiles from the past few days the spamming has increased to such a level that its flooding almost everone’s timelines.
TheNextWeb and AllFacebook reports that this might be the after effect of Mass Hacking of Faceb0ok Accounts (and vice versa). What is more embarrassing is that these all facebook spam posts include much of Pornographic and Violent related images or messages which may seem to others that it was written or posted by you. They say ”Mass Hacking of Facebook Accounts May Have Started as Long as 48 Hours Ago..before the reports of widespread spams came.”

The reasons for these large scale compromise are being directed to many including Anonymous and the 4Chan forums. Anonymous is being blamed because of their ‘Fawkes Virus’ which the Anonymous have claimed was made by their programmers.
How to Find If Your Facebook Account Has Been Hacked (Compromised)
Listed here are tips that will help you identify if your facebook account has been hacked.
  1. Check if you can login with your password – Mostly Hackers would try to change the password of the hacked account in an attempt to take complete control over the account.
  2. Ask your friends – Ask your friends if they have seen anything suspicious on your account like vague status updates or any thing suspicious in their chats.
  3. Check your Facebook login Sessions of the last accessed device- Follow the screenshot and you will find the Location and Device name of the person who accessed your account.

4. Check your Updates yourself – Browse through your Timeline or profile and check if there is any unwanted post or comment on others post.

How to Secure Your Facebook Profile from Hack Attempts
I have already written a well explained Article on the above topic which will help you to Protect your account from unauthorized access. Read the Full Post here [How to Secure Your Facebook Account]
How to Prevent Spams from Spreading
Spams become viral because of the Human nature of curiosity and ignorance mixed together When someone sees a spam post which has some title like ‘OMG! Watch this!!!! You wont Believe it!! :O’ etc, Your tend to click on the link to view the post which makes the post getting autoshared to your friends who do the same.
For the same reason there is so much of Pornographic content spam on the facebook from the past few days.. People click on the images to watch the image which tends to infect them and share the post on others wall.
This reminds me of a status update of one of my friend which describes this attitude perfectly! LOL
lol facebook spam
Also this case of Porno and Violent images spreading so fast shows the incapability of Facebook to distinguish inappropriate content without the help of its users, In a post I have described how you can help the community by doing your part (takes only 5-6 seconds) for a cleaner and safer web and social network. You can (I will say “Must) read this post over here – [How You Can Help To Remove Spams from Social Networks] This small act can prevent much of your friends from watching the spam post and facebook or other social networks will be notified of the spam and they will be removed.
The social network also recommends you to scan your computer for malware from these spams which can further lead to account hacks and spam origins. Remember that the Spams might have generated through Hacked Accounts but the Spams can also Lead to getting accounts hacked.

10 Best Free Android Apps For Facebook Users


Facebook is the largest social networking website, Facebook is having tons of active users.So Below 10 Android Apps that can be useful for active facebook users and casual users of the social networking.
10 Best Android Apps For  Facebook Lovers
1. Facebook for Android
Share and stay connected with your friends with the Facebook for Android app.Facebook for Android makes it easy to stay connected and share with friends. Share status updates from your home screen, chat with your friends, check out your News Feed, review your upcoming Events, look at your friends’ walls and user info, check in to Places to get Deals, upload Photos, share links, check your Messages, and watch videos.
2. Facebook Messenger
Facebook Messenger is a faster way to send mobile messages to friends. With Messenger, you can send and receive messages with any of your friends around the world or anyone in your mobile contacts list. Messenger is available on iPhone, Android, and Blackberry.
 3. Go! Chat For Facebook
Talk with your friends via Facebook chat. Send photos, voice notes and more!
Go!Chat for Facebook lets you talk with your friends via Facebook chat.
4. Friend Caster For Facebook  
FriendCaster for Facebook – the best Facebook experience on Android devices!FriendCaster for Facebook gives you the best Facebook experience on Android devices!
5. Facebook Funny Status
Funny Status Updates for Facebook is an amazing App that allows you to significantly enhance your experience with Facebook. This App is the ULTIMATE companion for your Facebook App.
6. Video To Facebook 
Upload videos directly from your phone to your Facebook account!Allows you to upload videos directly to your Facebook account, groups, or pages that were recorded from your phone. After a video is uploaded it will also be posted to the wall. You can select your privacy settings for the uploaded video ensuring the correct people see it.
7. Facebook Checkin 
Check-in to Facebook Places with the highest rated Check-in app for Android!Facebook check-in is quick, beautiful and even automatic with Smart Places Checkin.
 8. Photo For Facebook
Facebook Photos on your Phone. View, edit, upload, and save photos.Everything you want to do with Facebook Photos. Including photo uploads and tagging photos.
9. Simple Facebook Chat
Simple Chat  android app is allows you to use the Facebook chat from your Android device.
10. Facebook Friends Checker
Track changes in your friend list and see who removes you from Facebook! FREE!!Very basic app to keep track of changes in your friend list and see who removes you from Facebook!
Hope you liked these Android Applications to buzz up your Droid! Do share your experience with them.

[VIDEO]Yeahh!! It Happens on Live Television – How to Stop Spreading This Spam


My Facebook timeline (you no longer call it wall after the facebook update) was filled with this spam video from many friends who clicked on the link on their timeline. The thumbnail posted along with the link on the timeline looks like a video and adding to it the most cleverest part the spammer did was adding the users name on the post in the timeline. This urges the user to further think the video was posted by his/her friend since it directly calls out their name and asks them to watch the video.
Though you may already be knowing that it was a spam after you clicked on the link, You still might be spamming your friends timeline every hour or so and many of my friends told they had no idea how it was happening. This post will help you to stop the spam post from being spread on your friend’s timeline.
How the Spam Infected You.
Given below are the steps that you passed through when you clicked on the link on your timeline. I have done this inside a sandboxie.
Step 1. You clicked on the link and Landed on a page which is similar to the one below.
Step 2.You were asked to click on the Install Plugin in order to watch the video, You were so desperate to watch the video that you least bothered to look around the page and notice that its not a Trustworthy Youtube page. Finally you clicked on the link. 

Step 3. You clicked on Allow incase you were using Firefox. 

Step 4. You clicked on Install after the countdown. If you had bothered to look a bit you would have noticed the site serving the addon under the Youtube Extension heading. 


Step 5. Refreshed the page > Either watched a lame fake video else Punched your fist on the desk realizing it was fake. :/ 

How to Disinfect Yourself from the Spam.
Firefox Users -
Step 1. Open Browser > Click on Options > Addons OR Press Ctrl + Shift +A.

Step 2. Click on Remove button beside the Youtube Extension or something similar. 


Step 3. Restart Browser.
Chrome Users -
Step 1. Open Browser > Click on the Spanner Icon (Settings) > Tools > Extensions.

Step 2. Click on Remove button beside Extension Youtube or something similar. 

After performing the above steps, It is recommended to use CCleaner application and clear all cookies and caches of your browsers.
How to Prevent Spam Posts on Your Timeline.
Till the spam is blocked, It is recommended that you disable others ability to post on your timeline.
To block it, Follow these instructions.
Open Privacy Settings > How you connect > Who can post on your timeline > Change it to ‘Only Me’.
These instructions should save you from the spam attacks, Do read our Facebook Security Guide for more information on protecting your account.
It is suggested that you share this post on your profile and let others know how they can stop spamming from their profiles.


How to Deactivate Facebook Timeline and Get Back the Old Profile (Updated)


Facebook Timeline was recently launched on all Facebook Accounts across the globe and since it is a feature that affects our daily Facebooking, there is both likers and haters for the feature. If you want to try out Facebook Timeline but the feature is not yet active on your account then you can follow the steps listed here to enable facebook timeline on your profile.
For those who are fed up of Facebook Timeline and would like to deactivate facebook timeline view they can follow the steps listed here and get back the old Facebook profile view.
*Note: Its important to note that Facebook Timeline is a server side feature/change and can only be deactivated from your profile by the Facebook team (which unfortunately is not a happening thing :P ) What we are going to do here is a client side tweak that will get us back the old profile view only for our browser. Other’s profile will also appear in the normal form BUT others will still be able to see the timeline on your profile.

How to Deactivate Facebook Timeline

Method #1 (Update)
Step 1. Go to the following site. [LINK]
Step 2. Choose your Browser and install the Extension.
Step 3. Restart your browser and Clear the cache to get back your Old profile view.
Supported Browsers: Firefox,Chrome.

Work in progress: Safari,Internet Explorer.

Method #2

Chrome Users

Step 1. Right click on Chrome.exe Icon and Click on Properties.
Step 2. Make sure you are in the ‘Shortcut’ Tab.
Step 3. Paste the following code in the Target window after the : “C:\Program Files\Google\Chrome\Application\chrome.exe”
CODE – For Windows Vista & Windows 7 Users.
–user-agent=”Mozilla/4.0 (compatible; MSIE 7.0; Windows NT 6.0)”
CODE – For Windows XP Users.
–user-agent=”Mozilla/4.0 (compatible; MSIE 7.0; Windows NT 5.1)”
Note: Leave space between
“C:\ProgramFiles\Google\Chrome\Application\chrome.exe”<SPACE>–user-agent=”Mozilla/4.0 (compatible; MSIE 7.0; Windows NT 6.0)”

Step 4. Close your Browser and Restart it and hard refresh your profile page (Ctrl+F5). You will get the Old profile view with some Formatting errors like extra space between header etc. To Fix those errors, Install this Extension in Google Chrome. [LINK]

Firefox Users

Step 1. Open this [LINK] and install the User Agent Switcher Addon. Restart Browser.
Step 2. Open Firefox, Press the Alt Key > Open Tools > Default User Agent > Internet Explorer and choose Internet Explorer 7.
Step 3. Open Facebook and hard refresh your profile page (Ctrl+F5). You will get the Old profile view with some Formatting errors like extra space between header etc. To Fix those errors, Install this Addon in Firefox. [LINK]

Safari Users

Step 1. Open Safari Browser, go to the Preferences menu > Advanced > Tick the “Show Develop menu in menu bar” option.
Step 2. Click the page icon menu (next to the Gear icon near Search Bar) then select the Develop/user agent menu, Choose the User Agent as Internet Explorer 7.
Step 3. Open Facebook and hard refresh your profile page (Ctrl+F5). You will get the Old profile view with some Formatting errors like extra space between header etc. To Fix those errors, Install this Extension in Google Chrome. [LINK]

Opera Users

Opera does support changing user agents to Internet Explorer, But there is no way to set it to specific version of IE so this trick wont work in Opera, Although if you want to learn how to change user agent in Opera for specific sites. The follow the steps below.
Step 1. Open the site where you want to change user agent.
Step 2. Press F12 Key.
Step 3. Choose Edit Site Preference > Network > Browser Identification.
Step 4. Choose Mask as Internet Explorer OR any other that you want to choose.

Internet Explorer

If you are using Internet Explorer 7 then no need as you already have the Non-Timeline aka old profile view. If you are using updated versions of IE then you can try to use the compatibility view of the browser to try and get the Old Profile View.
Step 1. Open Facebook Profile Page.
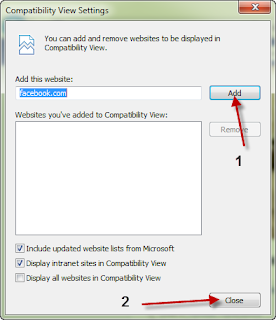
Step 2. Press Alt Key. Click on Tools > Compatibility View Settings.
Step 3. If facebook.com is already filled in, Click on Add else fill in facebook.com and Click on Add followed by Close.


Step 4.
 Refresh the page.
Credits: FB Purity
Hope you liked this Tutorial to Disable Facebook Timeline. Share it with your friends on Facebook, Do you like the way Facebook keeps updating? Leave your Vote and share your comments.
Do you think Facebook should conduct a Poll before bringing out any new feature?
  •  
  •