Step 1. Download this APK file. [LINK]
Step 2. Uninstall your existing Dropbox App from your Android Phone, Go to Settings > Applications > Manage Applications > Dropbox > Uninstall.
Step 3. Install the Downloaded APK file which is a modified version of Dropbox app. (Modded by a beloved XDA Member : theos0o)
Step 4. Open the Application > Enter your Email and Password of your Dropbox account.
Step 5. Check your E-Mail associated with the Dropbox for an Email from Dropbox which reads the following:
Hi ****** (Your Username),
Congrats on becoming a Dropbox Guru! We’ve awarded you 23 GB of bonus space for the next 24 months! You now have 27.38 GB on Dropbox. To get even more space, check out our upgrade options.
Thanks again for supercharging your HTC device with Dropbox!
Enjoy,
- The Dropbox Team
- The Dropbox Team
If you have Dropbox PC Software installed, You can expect this popup:
You are probably overjoyed if you are a Cloud Storage freak (I am one).
Now what about those who don’t have an Android? No I won’t disappoint you by saying you need to have an android to avail this offer. Read on.
How to Get 23GB+ of Free Space on Your Dropbox Account If You DON’T Have an Android Phone.
This part is taken from this post [LINK]
Part 1 – Installing the Android Emulator.
Step 1. Download the required Android SDK from this [LINK] according to your platform.
Step 2. Install it on any of your drives.
Step 3. Launch the SDK Manager.exe from the Start Menu.
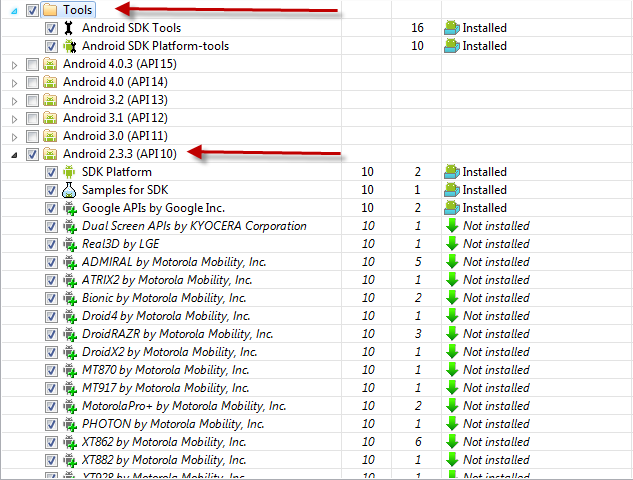
Step 4. It will show the Installed Packages and Options to install the uninstalled packages.
Step 5. Untick all the packages and Re-Tick only ‘Tools’ and ‘Android 2.3.3 (API 10)’, Click Install Packages > Accept. It might take some time depending on your Internet Connection.
Part 2 – Creating Android Virtual Device.
Step 1. Launch AVD Manager.exe from Start Menu.
Step 2. Click New > In the new window, Enter any Name, Choose Target as Android 2.3.3 – API Level 10, Size anything like 150MB,200MB etc.
Step 3. Click Create AVD, It might seem to be Not Responding but wait till the AVD is created (might take 1-2 Minutes)
Step 4. Choose the newly created AVD and click Start > Launch.
Part 3 – Upgrading the Dropbox to 23GB+.
Step 1. Initial Launch might take some time, After the Android Home Screen is loaded. Unlock the screen by Sliding the Lock Icon to the right.
Step 2. Click on the Web Icon.
Step 3. Paste the following URL in the Address Bar of Android Browser “http://db.tt/S7MnNnBh”
Step 4. Your Application will be downloaded in your Downloads Folder in Menu.
Step 5. Install the application.
Step 6. Open the app, Enter your Dropbox Email and Password > Login.
Step 7. Check your Dropbox account and you will see that your account has been gifted with 23GB of free storage or Check your E-Mail ID for an E-Mail from the dropbox team.
[Credits : XDA]
Note : This storage is valid for 2 Years only.
Hope you enjoyed the article and successfully upgraded your Dropbox account.


.png)

No comments:
Post a Comment